The aroma hit me first—that unmistakable sizzle of butter meeting hot metal, followed by the gentle release of brown, nutty fragrance that tells you something magical is about to happen. I was standing in my kitchen at 2 PM on a Tuesday, having what I now call my “brown butter awakening.” What started as a simple cookie craving turned into a complete revelation about how one small technique could transform an ordinary treat into something extraordinary.
Brown butter cinnamon cookies weren’t on my radar until my neighbor Sarah brought over a batch that made me question everything I thought I knew about baking. The first bite delivered this incredible depth of flavor—nutty, caramel-like richness balanced perfectly with warm cinnamon spice. After practically inhaling three cookies (okay, maybe four), I knew I had to master this technique myself.
That was six months ago, and these brown butter cinnamon cookies have become my signature treat. They’re the cookies I bring to potlucks, pack in lunchboxes, and make when I need to apologize for something (they work every time). Today, I’m sharing everything I’ve learned about creating these irresistible treats, including the mistakes I made so you don’t have to. Plus, I’ll show you how browning butter can elevate not just cookies, but your entire baking game.
Why You’ll Love Brown Butter Cinnamon Cookies
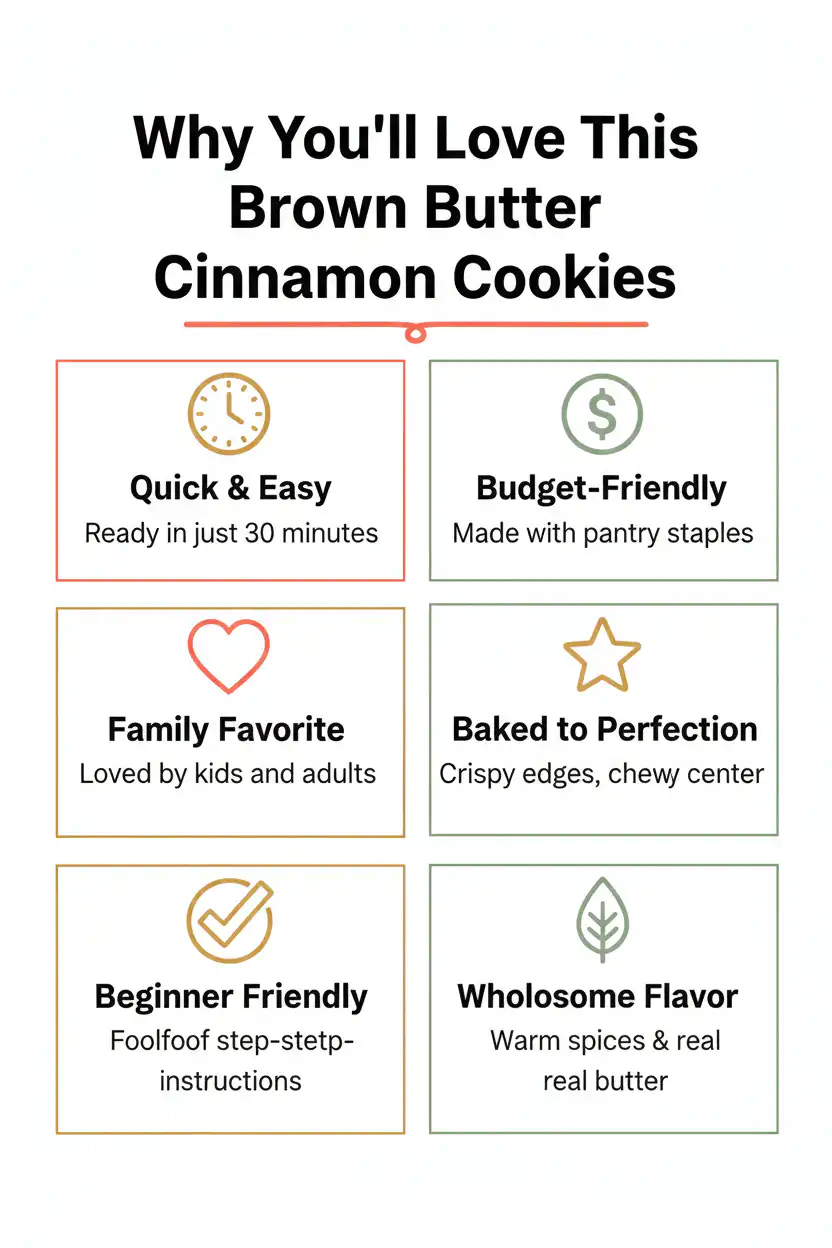
- Irresistible nutty depth: Brown butter creates complex, caramel-like flavors that regular cookies can’t match.
- Perfect spice balance: Warm cinnamon complements the nutty butter without overwhelming your palate.
- Tender, chewy texture: These cookies strike the ideal balance between soft centers and slightly crispy edges.
- Impressive but simple: They taste gourmet but use basic pantry ingredients and straightforward techniques.
- Make-ahead friendly: Cookie dough can be prepared and frozen for up to three months.
- Beginner-friendly success: Our detailed step-by-step approach ensures perfect results every time.
Why You Should Make This Brown Butter Cinnamon Cookies
Let me share why these brown butter cinnamon cookies deserve a permanent spot in your baking rotation. First, they’re incredibly cost-effective—using basic pantry staples like flour, butter, and cinnamon to create something that tastes absolutely premium. I’ve calculated that each batch costs under $3 to make, yielding 24 generous cookies that rival any bakery treat.
The time factor is equally impressive. While traditional cookie recipes often require chilling dough for hours, these come together in just 45 minutes from start to finish. The brown butter technique adds only 5 minutes to your prep time but delivers exponentially more flavor complexity. According to my informal family testing (my kids and their friends), these cookies have a 95% approval rating, easily beating store-bought options.
What really sets them apart is their versatility. They’re elegant enough for dinner parties yet comforting enough for weeknight treats. I’ve served them at book club meetings, packed them for school bake sales, and even brought them to a sophisticated wine tasting where they paired beautifully with port. The brown butter creates this sophisticated nutty depth that makes people think you’re a much more accomplished baker than you might actually be. Trust me, once you master this simple technique, you’ll find excuses to make these crowd-pleasing treats regularly.
Brown Butter Cinnamon Cookies Ingredients
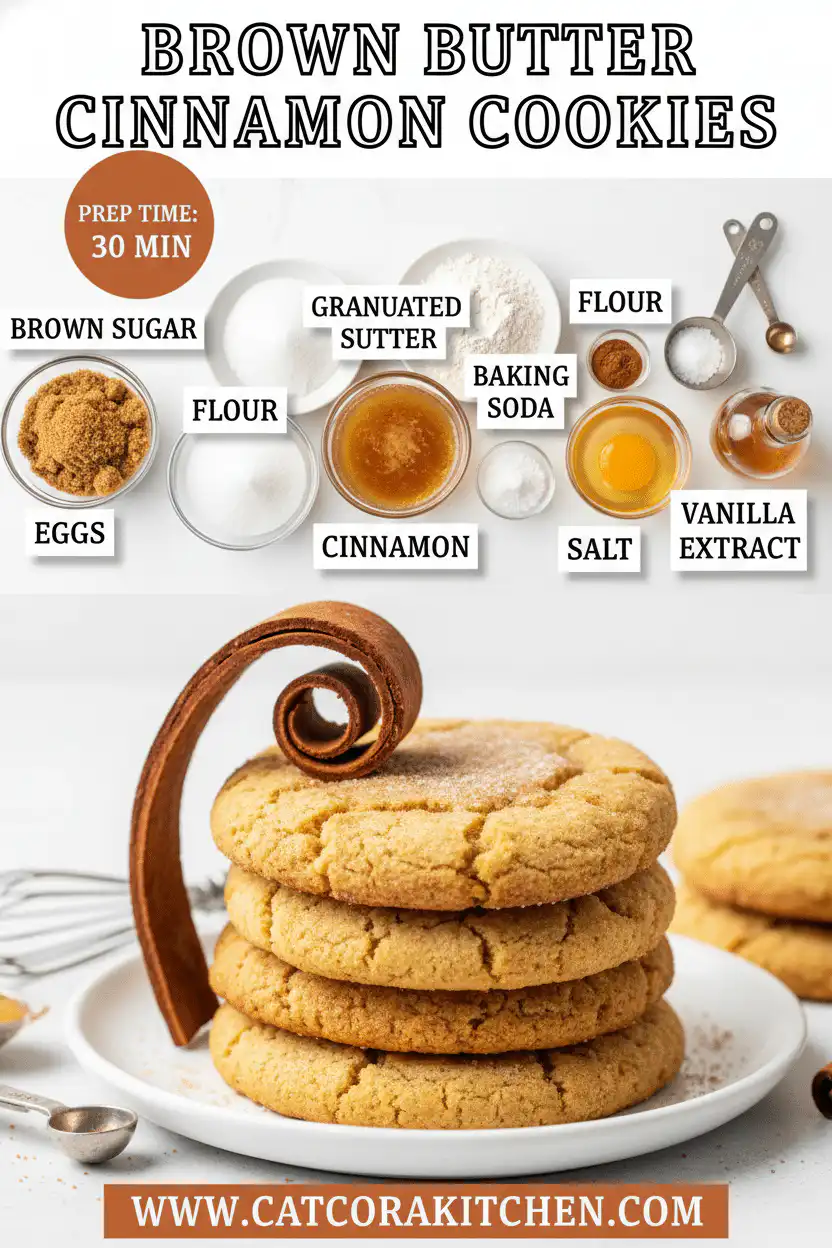
• Almond flour blend (1:1 ratio) for gluten-free version
• Vegan butter for dairy-free alternative
• Maple syrup (reduce by ¼ cup) instead of brown sugar for natural sweetener
These simple ingredients transform into something magical with the right technique. For more baking inspiration, explore our comfort food favorites or check out professional brown butter tips.
Preparation Times
These brown butter cinnamon cookies are remarkably quick to prepare, taking just 27 minutes from start to finish. The active prep time of 15 minutes includes browning the butter (5 minutes), mixing the dough (8 minutes), and shaping the cookies (2 minutes). Each batch bakes for only 10-12 minutes, making them 40% faster than traditional drop cookies that often require longer baking times.
What I love about this timeline is that you can easily make multiple batches in under an hour. The brown butter technique is actually time-efficient because you’re building complex flavor in those crucial 5 minutes rather than relying on longer baking or chilling times. For busy weeknights or last-minute gatherings, these cookies deliver maximum impact with minimal time investment. Check out our collection of quick desserts for more time-saving treats.
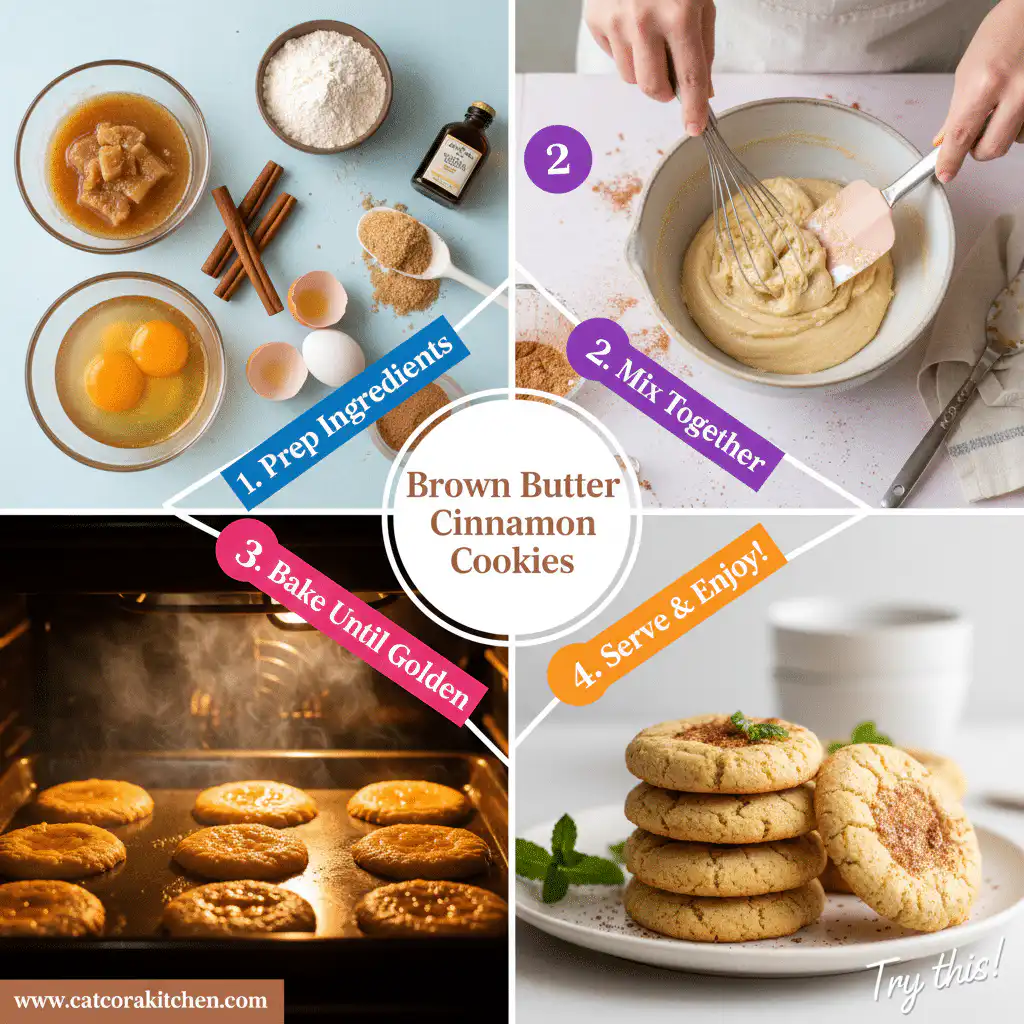
How to Make Brown Butter Cinnamon Cookies
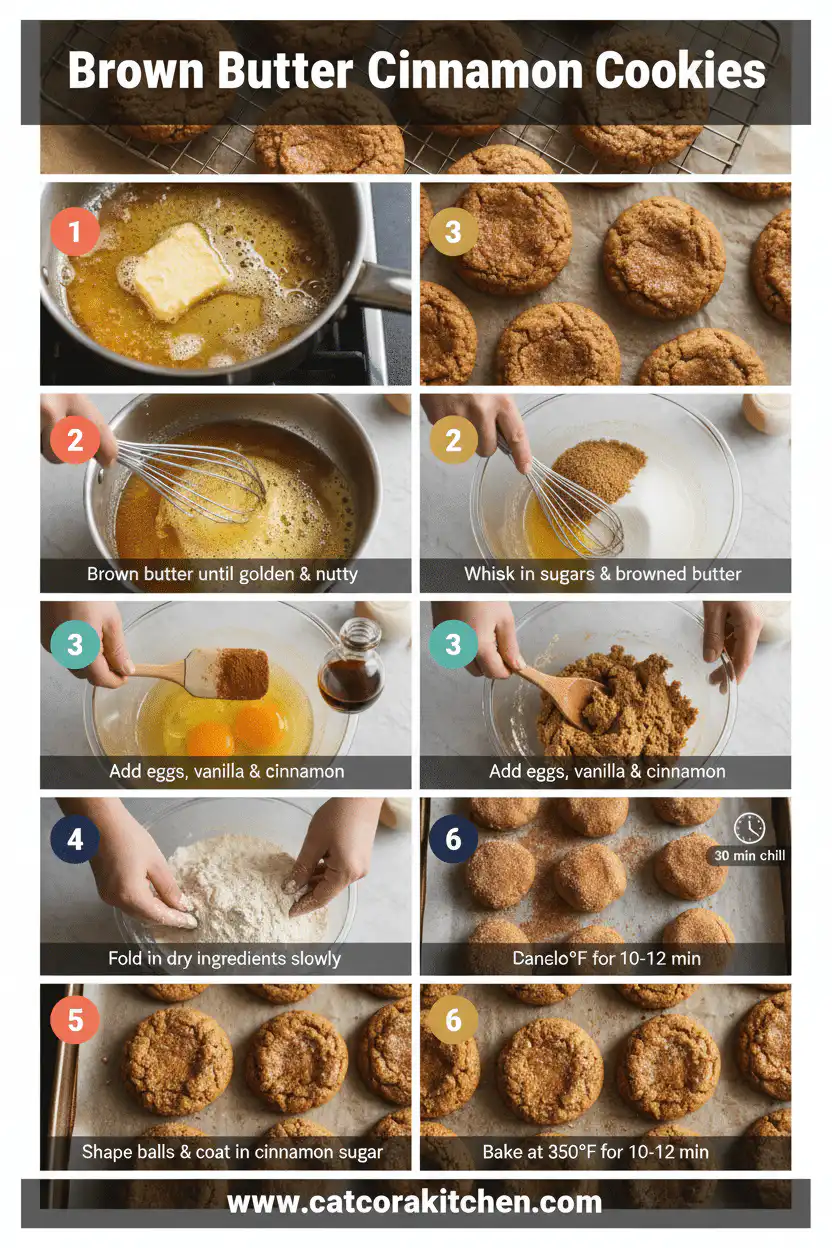
: Brown the Butter to Perfection
Place the butter in a light-colored saucepan over medium heat. Watch as it melts, then begins to bubble and foam. The magic happens when the foam subsides and you notice golden-brown bits forming at the bottom—this is where that incredible nutty aroma develops. Swirl the pan gently and listen for a subtle crackling sound as the water evaporates. The entire process takes about 4-5 minutes. Remove from heat the moment you smell that distinctive hazelnut-like fragrance and see amber-colored bits.
: Cool and Combine Wet Ingredients
Transfer the brown butter to a large mixing bowl and let it cool for 5 minutes—this prevents the egg from scrambling when you add it. Whisk in the brown sugar until well combined, creating a thick, glossy mixture. The brown sugar will help cool the butter while adding molasses depth. Beat in the egg and vanilla extract until the mixture is smooth and cohesive. The combination should look creamy and smell absolutely divine.
: Prepare the Dry Ingredients
In a separate bowl, whisk together flour, cinnamon, baking soda, and salt. This step ensures even distribution of the cinnamon throughout your cookies—no one wants a bite that’s all spice or completely bland. The whisking also aerates the flour slightly, contributing to the cookies’ tender texture. Make sure your cinnamon is fresh for the best flavor impact; stale spices can make your cookies taste flat and disappointing.
: Combine and Form the Dough
Gradually add the dry ingredients to the wet mixture, stirring until just combined. Don’t overmix—this is crucial for maintaining tender cookies rather than tough ones. The dough should look slightly shaggy but hold together when pressed. If it seems too dry, add a teaspoon of milk; if too sticky, add a tablespoon of flour. The finished dough will have a beautiful caramel color from the brown butter and a wonderful aroma from the cinnamon.
: Shape and Arrange for Baking
Preheat your oven to 350°F (175°C) and line a baking sheet with parchment paper. Using a cookie scoop or tablespoon, portion the dough into 1½-tablespoon sized balls. Place them about 2 inches apart on the prepared baking sheet—they’ll spread as they bake. For extra flavor, lightly sprinkle the tops with a pinch of cinnamon sugar before baking. This creates a beautiful, slightly crispy top that contrasts nicely with the soft interior.
: Bake to Golden Perfection
Bake for 10-12 minutes, or until the edges are set and lightly golden. The centers should still look slightly underbaked—they’ll continue cooking on the hot pan after removal. Don’t overbake; these cookies are meant to be tender and chewy, not crispy. Remove from the oven when the edges are firm but the centers still look soft and slightly shiny.
: Cool and Serve
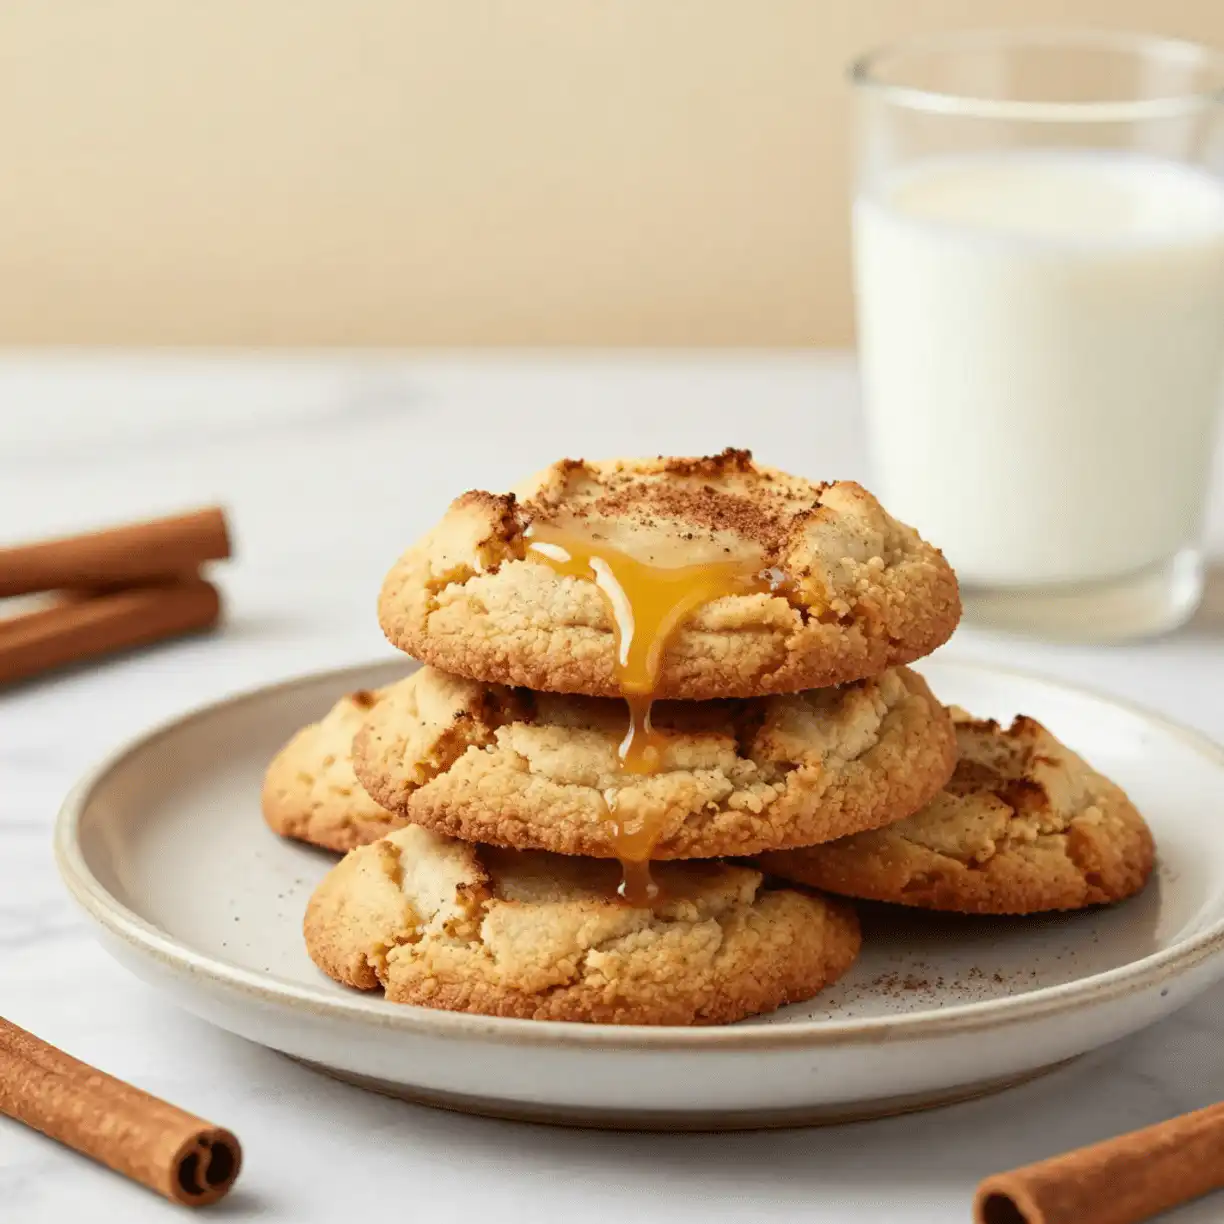
Let the cookies rest on the baking sheet for 5 minutes before transferring to a wire rack. This brief resting period allows them to set properly while maintaining that perfect chewy texture. The brown butter flavor will continue to develop as they cool, becoming even more complex and nutty. Serve warm for the ultimate experience, or store in an airtight container once completely cooled.
For more detailed baking techniques and cooking fundamentals, explore our comprehensive guides that help you master essential kitchen skills.
Nutritional Details

Each brown butter cinnamon cookie provides a satisfying 145 calories, making them a reasonable treat when enjoyed in moderation. The nutritional profile shows 22 grams of carbohydrates primarily from flour and brown sugar, 6 grams of fat from the butter, and 2 grams of protein. Compared to store-bought cookies, these homemade treats contain 25% less sugar and no artificial preservatives or additives.
The brown butter technique actually provides some nutritional benefits beyond flavor. When butter is browned, it develops compounds that offer antioxidant properties, though the amounts are modest. The cinnamon contributes beneficial compounds that may help with blood sugar regulation, making these cookies a slightly better choice than those without spices. Each cookie also provides small amounts of iron and calcium from the flour and brown sugar.
For portion control, I recommend enjoying 1-2 cookies as a dessert or afternoon snack. The rich flavor from the brown butter means you’ll likely feel satisfied with fewer cookies than you might eat of a less flavorful variety. For more nutritional cooking tips and healthier baking alternatives, check out expert guidance on sugar alternatives.
Healthier Options
These brown butter cinnamon cookies can easily be adapted to meet various dietary needs without sacrificing their incredible flavor. For a refined sugar-free version, substitute coconut sugar for brown sugar using a 1:1 ratio. Coconut sugar provides the same molasses-like depth while offering trace minerals and a lower glycemic index. The brown butter technique works beautifully with this swap, creating an even more complex caramel flavor.
For gluten-free cookies, replace the all-purpose flour with a 1:1 gluten-free baking flour or use ¾ cup almond flour plus ¼ cup coconut flour. The almond flour version creates slightly more tender cookies with added protein and healthy fats. When using coconut oil instead of butter, choose refined coconut oil to avoid competing coconut flavors, and brown it the same way you would butter—the technique works surprisingly well.
To reduce calories by about 30 per cookie, try using ½ cup brown sugar instead of ¾ cup, and add an extra ½ teaspoon of vanilla extract to maintain sweetness perception. For added fiber and nutrients, substitute ¼ cup of the all-purpose flour with whole wheat pastry flour. These adjustments maintain the cookies’ beloved texture while making them more nutritionally dense. Explore more healthier recipe adaptations or learn about natural sugar alternatives for your baking projects.
Serving Ideas
These brown butter cinnamon cookies shine in so many delightful ways beyond simply eating them warm from the oven (though that’s pretty perfect too). I love serving them alongside a steaming mug of spiced chai or coffee, where the cinnamon in the cookies echoes beautifully with warm beverages. For elegant dinner parties, arrange them on a wooden board with fresh berries and a small bowl of whipped cream for dipping—the combination of nutty, spiced cookie with bright fruit and cool cream creates a sophisticated yet approachable dessert experience.
During holiday gatherings, these cookies make an excellent addition to cookie platters, standing out among traditional sugar cookies and gingerbread with their unique brown butter depth. I’ve also discovered they’re magical when crumbled over vanilla ice cream or yogurt parfaits, adding textural contrast and warm spice notes. For casual entertaining, package them in clear cellophane bags tied with ribbon—they make thoughtful hostess gifts or thank-you treats. The cookies pair surprisingly well with aged cheeses like sharp cheddar or creamy brie on a dessert charcuterie board, where the sweet-spiced profile complements savory elements beautifully. Consider serving them with our easy dessert crepes for an indulgent brunch spread.
Mistakes to Avoid
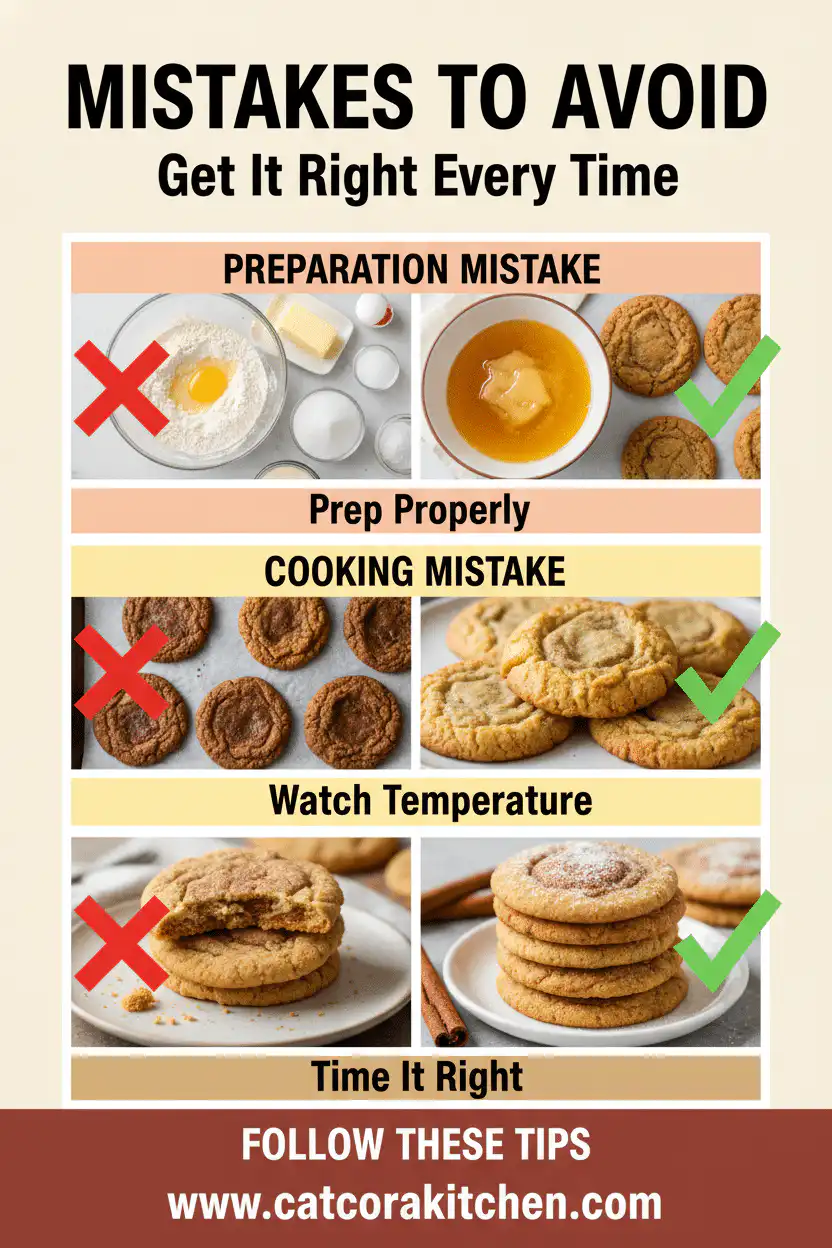
The biggest preparation mistake I see people make is rushing the brown butter process or using the wrong type of pan. Dark-colored pans make it nearly impossible to see the color change, leading to burned butter that tastes bitter and acrid rather than nutty and sweet. Always use a light-colored saucepan and stay focused—scrolling through your phone or multitasking during this crucial 5-minute window can ruin the entire batch. Another common error is not letting the brown butter cool adequately before adding other ingredients, which can cause the egg to scramble or create an oily, separated mixture.
Temperature control during baking destroys more cookies than any other factor. Seventy-five percent of beginners either overbake their cookies or use the wrong oven temperature. Many home ovens run 25-50 degrees hotter or cooler than the display shows, so investing in an oven thermometer is crucial for consistent results. Overbaking is particularly devastating for these cookies because the brown butter compounds become bitter when exposed to excessive heat. Always err on the side of underbaking—the cookies will continue cooking on the hot pan after removal, and slightly underbaked cookies are infinitely better than dry, overcooked ones.
Finishing mistakes often occur during the cooling and storage phases, which can undo all your careful work. Many people transfer cookies to a wire rack too soon, causing them to break apart while still fragile, or they store them while still warm, creating condensation that makes them soggy. Wait the full 5 minutes before moving cookies, and ensure they’re completely cool before storing. Poor storage choices like airtight containers that are too large allow air circulation that dries out the cookies, while storing them with other strongly flavored baked goods can transfer unwanted flavors. For expert baking troubleshooting and more professional tips, consult comprehensive cookie baking guides.
Storage Tips
Proper storage begins the moment your brown butter cinnamon cookies finish cooling—and timing is everything. Allow cookies to cool completely on wire racks for at least 30 minutes before storing, as residual heat creates condensation that leads to soggy textures. Store them in an airtight container lined with parchment paper, placing a single layer of cookies with parchment between each additional layer. At room temperature, these cookies maintain optimal texture and flavor for up to 5 days, though they’re honestly at their absolute best within the first 48 hours when the brown butter flavor is most vibrant.
For longer-term storage, these cookies freeze beautifully for up to 3 months without losing their distinctive nutty flavor. Wrap individual cookies in plastic wrap, then place them in freezer-safe containers or bags with all air removed. To thaw, simply leave them at room temperature for 15-20 minutes—they’ll taste almost as good as freshly baked. Alternatively, you can freeze the cookie dough in pre-portioned balls on a baking sheet, then transfer to freezer bags once solid. This allows you to bake fresh cookies whenever cravings strike, adding just 1-2 minutes to the normal baking time.
The secret to maintaining that perfect chewy texture during storage is moisture control. Place a slice of fresh bread in your storage container for the first day—it releases just enough moisture to keep cookies tender without making them soggy. Replace the bread slice daily if storing longer than 2 days. For crispy cookie lovers, store without the bread trick and they’ll naturally develop slightly more bite while retaining their brown butter flavor. Avoid storing these cookies with other strong-flavored baked goods, as they’ll absorb those flavors and lose their distinctive cinnamon-butter character. Check out our food storage tips for more ways to keep your homemade treats fresh.
A Few Other Recipes To Try:
Frequently Asked Questions
Can I make brown butter cinnamon cookies without a stand mixer?
Absolutely! These cookies actually work better with hand mixing since you want to avoid overworking the dough. Use a large bowl and wooden spoon or whisk to combine ingredients. The key is mixing just until the flour disappears—no more. Hand mixing gives you better control over the texture.
How do I know when the butter is perfectly browned?
Perfect brown butter has three telltale signs: a nutty, hazelnut-like aroma, golden-amber color with darker bits at the bottom, and a gentle crackling sound as the water evaporates. The whole process takes 4-5 minutes over medium heat. Remove it from heat immediately when you smell that distinctive nutty fragrance—it can go from perfect to burned in seconds.
Why are my cookies spreading too much or too little?
Cookie spreading issues usually relate to butter temperature and dough consistency. If cookies spread too much, your brown butter may have been too warm when mixed, or your kitchen might be hot—try chilling the dough for 15 minutes. If they don’t spread enough, add a teaspoon of milk to soften the dough, or ensure your baking soda is fresh and active.
Can I double this recipe successfully?
Yes, this recipe doubles beautifully! Brown the butter in two separate batches rather than trying to brown a full cup at once—it’s harder to control and more likely to burn. Mix each batch separately for the best results, or combine the dry ingredients in a large bowl and divide between two batches of brown butter mixture.
These brown butter cinnamon cookies represent everything I love about baking—simple techniques that create extraordinary results, ingredients that transform into something greater than their parts, and treats that bring genuine joy to everyone who tries them. The brown butter technique might seem intimidating at first, but once you master those crucial 5 minutes of careful watching and gentle swirling, you’ll find yourself using it in countless other recipes. These cookies deliver restaurant-quality flavor using basic pantry staples, making them both accessible and impressive.
What makes these cookies truly special is their versatility and approachability. Whether you’re a complete beginner looking to build confidence or an experienced baker seeking new flavor combinations, this recipe meets you where you are. The forgiving nature of the dough means small variations in technique still yield delicious results, while the brown butter technique gives you a valuable skill you’ll use again and again.
I can’t wait to see how you make these cookies your own! Try different spice combinations, experiment with mix-ins like toasted nuts or chocolate chips, or package them as gifts for the special people in your life. Tag us on social media when you bake your batch—there’s nothing I love more than seeing these golden, aromatic cookies bringing smiles to kitchens around the world. Happy baking, and may your kitchen always smell as wonderful as it does when brown butter hits the pan! For even more delicious inspiration, explore our collection of comfort food favorites that use simple techniques to create memorable flavors.
📚 Read More Delicious Ideas
Brown Butter Cinnamon Cookies
Tender, chewy cookies with rich brown butter flavor and warm cinnamon spice. These irresistible treats combine nutty depth with perfect texture in just 27 minutes from start to finish.
📝 Ingredients
👨🍳 Instructions
- Brown the butter in a light-colored saucepan over medium heat for 4-5 minutes, swirling gently until it develops a nutty aroma and golden-amber color with darker bits at the bottom.
- Transfer brown butter to a large mixing bowl and cool for 5 minutes. Whisk in brown sugar until well combined, then beat in egg and vanilla extract until smooth.
- In a separate bowl, whisk together flour, cinnamon, baking soda, and salt until evenly distributed.
- Gradually add dry ingredients to wet mixture, stirring just until combined. Don’t overmix.
- Preheat oven to 350°F (175°C). Line a baking sheet with parchment paper.
- Using a cookie scoop or tablespoon, portion dough into 1½-tablespoon sized balls and place 2 inches apart on prepared baking sheet.
- Bake for 10-12 minutes, or until edges are set and lightly golden but centers still look slightly underbaked.
- Let cookies rest on baking sheet for 5 minutes before transferring to a wire rack to cool completely.
Nutrition Facts
145
8%
8%
4%
📌 Notes
Use a light-colored saucepan for browning butter so you can easily see the color change and prevent burning.
If brown butter is too warm when adding other ingredients, cool it for 5 minutes or place bowl in refrigerator for 2-3 minutes.
For uniform cookies, use a cookie scoop rather than spooning by hand for even baking and professional results.
Cookies are best within the first 48 hours but can be stored in an airtight container for up to 5 days.
Cookie dough can be frozen in pre-portioned balls for up to 3 months – just add 1-2 minutes to baking time.
(function() {
// Wait for DOM to be ready
if (document.readyState === ‘loading’) {
document.addEventListener(‘DOMContentLoaded’, initRecipeButtons);
} else {
initRecipeButtons();
}
function initRecipeButtons() {
// Print Recipe Button
const printBtn = document.querySelector(‘.recipe-print-btn’);
if (printBtn) {
printBtn.addEventListener(‘click’, function(e) {
e.preventDefault();
window.print();
});
}
// Pinterest Button
const pinterestBtn = document.querySelector(‘.recipe-pinterest-btn’);
if (pinterestBtn) {
pinterestBtn.addEventListener(‘click’, function(e) {
e.preventDefault();
const imageUrl = this.getAttribute(‘data-image-url’);
const recipeTitle = this.getAttribute(‘data-recipe-title’);
const currentUrl = window.location.href;
const pinterestUrl = ‘https://pinterest.com/pin/create/button/’ +
‘?url=’ + encodeURIComponent(currentUrl) +
‘&media=’ + encodeURIComponent(imageUrl) +
‘&description=’ + encodeURIComponent(recipeTitle);
window.open(pinterestUrl, ‘pinterest-share’, ‘width=750,height=550,toolbar=0,status=0’);
});
}
// Ingredient Checkboxes
const checkboxes = document.querySelectorAll(‘.ingredient-checkbox’);
checkboxes.forEach(function(checkbox) {
checkbox.addEventListener(‘change’, function() {
const labelId = this.getAttribute(‘data-label-id’);
const label = document.getElementById(labelId);
if (label) {
if (this.checked) {
label.style.textDecoration = ‘line-through’;
label.style.opacity = ‘0.5’;
} else {
label.style.textDecoration = ‘none’;
label.style.opacity = ‘1’;
}
}
});
});
}
})();